Quad 405 DIY illustrated guidelines - Step 1 to 3
This is the original 405-revision article published on this blog in 2006. We republish it on general demand.
Stefaan
I thought it was time to make an online step-by-step guide for upgrading a 405.
If you are in the US and you are looking for a DIY upgrade-kit, check out www.quad405.com. The guidelines remain the same but you won't have to pay more for low Dollar-rates and high shipment-costs ;-)
As I recently bought a very nice (but very old) 405-2 (thank you Leigh, I hope you had a good time in Antwerp) I will use this one as a photo-model. I will take pictures of everything I do and explain why I do it. All comments and tips are welcome of course.
The revision/upgrade will be a basic one without fancy or expensive things like the BB627, but I'll mention those options in the PS.
Click on the pictures to enlarge.
So here we go...
Step 1 - Getting the components together
This may be the hardest part... Aspecially if you are looking for audio-grade components at an affordable price. The components I will use in this revision are:

BHC Aerovox 10.000 MF 63 Volt for the power-supply. These are quite expensive (+/- 16 Euro each) but in the power-rails we need the best quality. A less expensive alternative may be BC-components or Philips.
- 100MF and 47MF 63V Audiograde capacitors for C5 & C10. In the 405-2 we will need 3 47MF per circuit-board.
- Bipolar capacitors of 10MF (for the clamp-circuit) and 47MF (for the DC-feedback) x2
- Metalfilm 1% 0,5W low-noise resistors for R2 and R6, and probably for R1, R3 and R4 as well (we'll come back to that).
- Burr Brown OPA604AP-chips for the input-channel. We'll need 100NF caps to stabilise the power-supply of the chips and 16V zener-diodes to make the chip feel happy.
- We'll also need some supplies like new fuses, IC-sockets, thermal compound, cables to replace the old cable-beam, LS & RCA connectors, PCB-connectors adl...
- Last but not least: the schematic that corresponds with the exact serial-number. That won't be a broblem: send me an e-mail.
- The minimum is of course screwdrivers, pliers, soldering-equipment and a multimeter
- Better would be a 2x50V lab power supply, a LF tone-generator and a 2 channel scope (but it is possible to do without them)
- Ideal would be a low-distortion sinus-generator and a distortion-meter as well. I don't have those myself (yet) so don't worry;-)
 The first step is to remove the top- bottom- and sidepanels. Sometimes, after 30 years, the screws are hard to remove. The best screwdriver to use is a Philips n°2 with a length of at least 20 cm.
We now understand why Quad made 4 hole's on the left- and the rightside of the backpanel: they were intended to facilitate manipulation of the screws of the circuit-boards.
I don't need to mention it's usefull to keep the screws apart. They can be replaced (they are M4 - which is a standard-size) but of course there is not much use in replacing the screws.
The best way to proceed is to remove the top-panel, then the bottom-panel and then the 2 side-panels.

The first impression of a newly opened 405 is usually a dusty one. This doesn't matter (in this stage ;-).
On the 405 on my table the voltage-selector is at 240 Volt. Switch it to 230 Volt. The connectors will have to be replaced (except the DIN-connector).
The LS-connectors were not only lousy in the first place, they are oxydated and will give a bad contact. The RCA-connectors are clearly worn. It's surprising there are any RCA-connectors, this is not standard. This amp has been modified.

The PCB-connectors have to be replaced anyway, they are oxydated and we will use new cabling.
I didn't spend time desoldering the cables, I cut them off. They will have to be replaced anyway.
The cable-beam of the 230V-side of the transformer should stay in place, there is no improvement in replacing it as there is only +/1 Amp max going through it. On the other side of the transformer we'll deal with up to 10 Amp.

Something is very strange with this amplifier. The Serial number is 42472 and the amplifier boards are M12565:6. The earlier version of the M12565:5 was used from serial number 59001 on. It says "Quad 405-2" on the front panel (launched in 1983 and) it says "1977" on the transformer. One can always find the year of production stamped on the transformer.
This is a recomposed 405! It has 405-2 circuit boards in a 405-1 case. It also has 2 clamp-circuits (one on the 405-2 board and one on the LS-outputs like in the 405-1).
That's no problem, we'll throw away the 405-1 clamp-circuit and make this a great-sounding 405-2.
Step 3 - Fitting in the Power Supply capacitors and the connectors
We'll do this step first and we'll fit in the capacitors with transparent Silicone, so it can dry for 24 hours before we continue tomorrow.
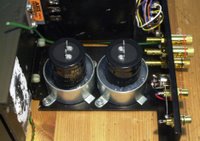
As modern capacitors are a lot smaller (and better ;-) than the ones used 30 years ago we can either buy new fixing-rings to fit them in or use Silicone to fix them in the original rings. Another alternative is to wind some self-adhesive tape around the caps. This will work if the caps are not nuch smaller than the rings.

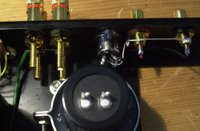
We'll mount the LS-outputs and the RCA-inputs before we fit in the capacitors. This makes working on the back-panel easier.
The mass LS-outputs do not have to be isolated from the chassis but the "hot" LS-outputs have to be isolated. The new RCA-inputs have to be isolated as well as in the 405 there is a difference between the input-mass and the output-mass.
The best order to mount everything is:
- The mass (black) LS-connectors with a (green) wire to the central mass-point on the frontpanel (this wire will be connected to the central mass-point later). We already put this wire in because it is easier to solder it when the capacitors are not in place. The mass LS-connectors don't need to be isolated from the chassis.
- The hot LS-connectors. Those need to be isolated from the chassis.
- The RCA-inputs. They are soldered to the L/R connectors of the 4-pin DIN
 -plug with normal wire.
 - The capacitors. The wiring of the power-supply will be done later, after the Silicone has dried. Make sure to fit the first capacitor with the + on the left and the second one with the - on the left. The left-side will be our central 0Volt mass of the power supply.

1 Comments:
I was wondering what is a good way to accurately drill the holes in the panel to fit the rca sockets. I recently tried to fit 2 pairs to an old cassette player and one socket is slightly out. I got better with practice.
Post a Comment
<< Home